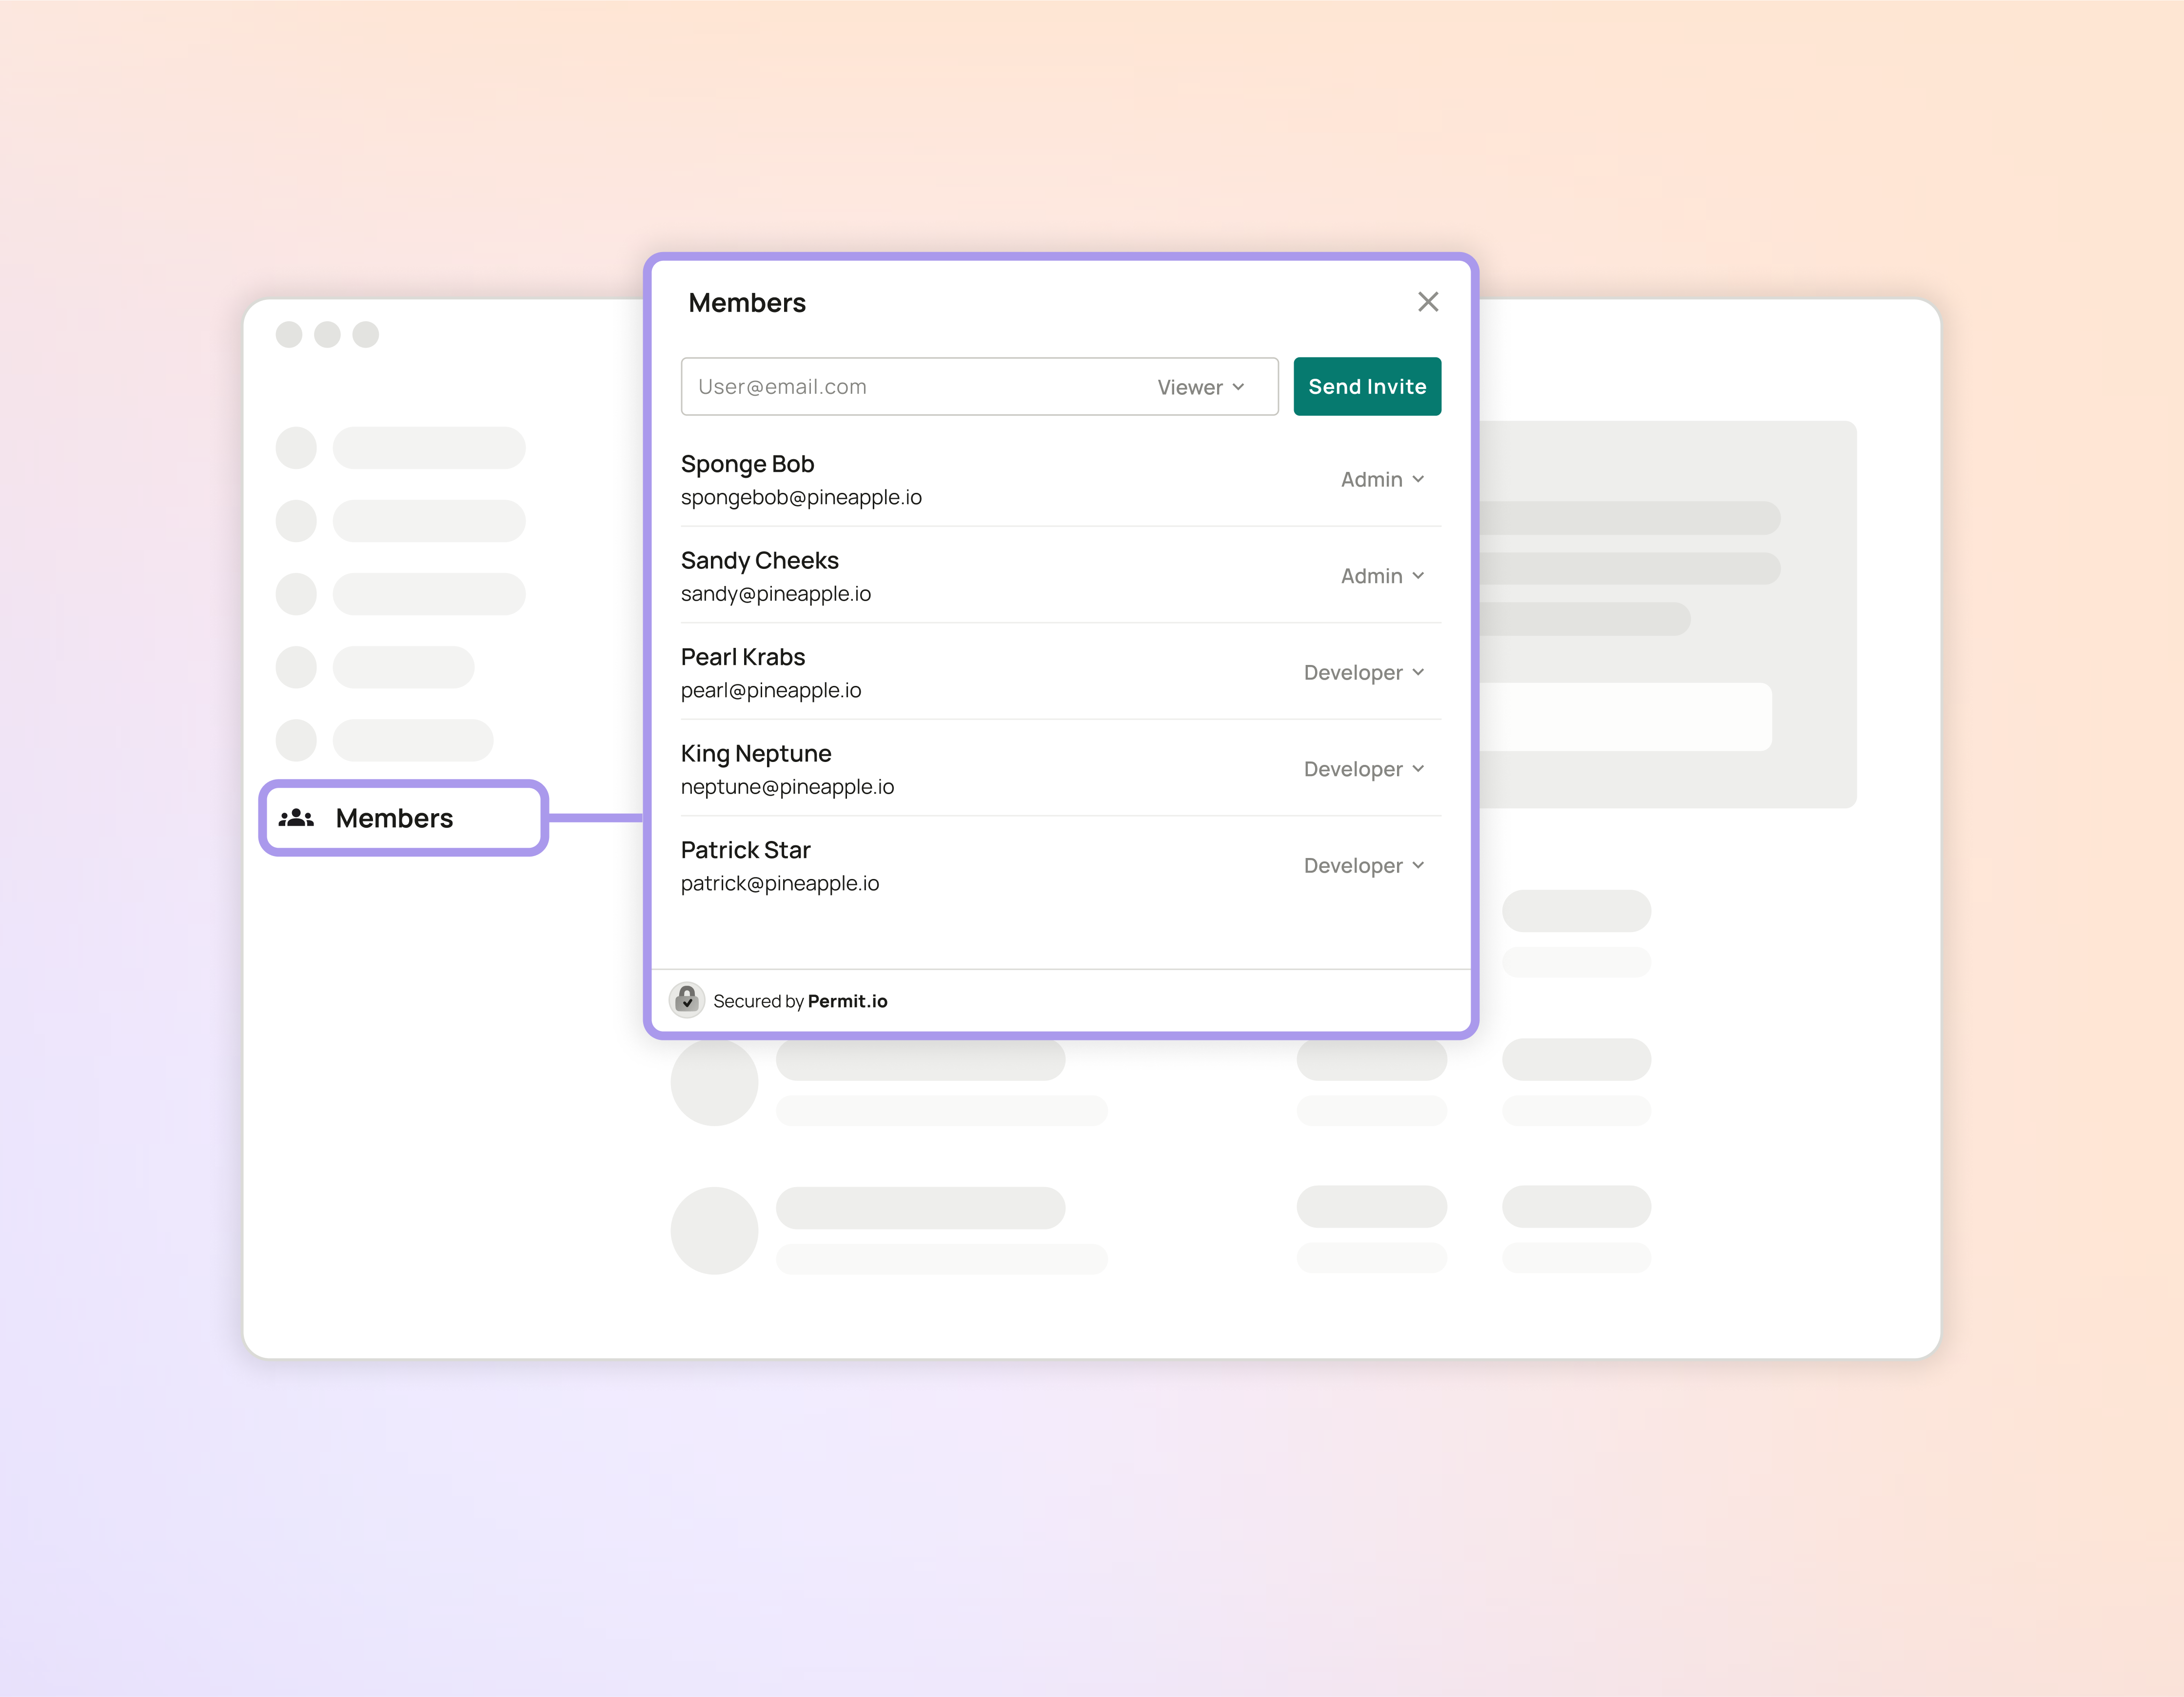
User Management Element
Effortlessly manage users and their permissions as a single secure, embeddable UI component.The User Management Element is an embeddable UI component that lets you take control of your whole team, and give other team members specific permissions levels that reflect how they can manage other users on your team.
Embedding the Element
Initializing Permit
In order to use Permit Elements, you need to be a user of Permit. When starting to use Permit, you will need to initialize an instance of Permit in your backend logic. This only needs to be done once, both to use Permit and Elements. Please rememeber to copy your SDK Secret Key and pass it into the initialized Permit object.
1
2
3
4
const { Permit } = require("permitio");
 const permit = new Permit(
    {token: permit_key_SECRET}
);
Server-side Login Route
You need to create a route in your backend server to allow your client to login_as themselves and get access the Permit Element.
The backend login_as route is a bit different if your backend is using cookies bearer token or custom auth headers to authenticate users.
You can choose the one that suits your backend best.
Install Permit-js
Once you have your application ready, you need to install Permits's JS SDK. This gives you access to our prebuilt embeddable Element components.
Add the Permit JavaScript SDK to you app:
# Navigate to your application's root directory

cd yourapp
npm install –save permit-js
Client-side login method
This function should be called as early as possible in your App. This is best done inside a App/index file; right after the users
had just had their identity confirmed by the Authorization provider you are using, but just before the Embededd component is loaded.
This is the permit element object that is calling the backend route we have configured previously and logging in the user.
1
2
3
4
5
6
permit.elements.login({
    loginUrl: 'https://your_app_url.com/permit_login,
    tenant: 'your_tenant_key',
    token:'<TOKEN>',
    loginMethod: LoginMethod.bearer
});
There are four things that need to be configured here:
loginUrl- The url that corresponds to your backend login route you created in the last step.loginMethod- The login method you are using in your backend.tenant(Optional) - The name of the tenant that the user is part of, you can set it at your backend as well.token(Optional) - If your login method is bearer token, you need to pass the token here.headers(Optional) - If your login method is custom headers, you need to pass the headers here.
There are 3 supported login options choose the one that you are using in your backend.
After you run login successfully you will get a cookie called permit_session which will allow you to
load your Permit Element securly and successfully.
Client-side logout method
This function should be called along with the logging-out logic that you have within your App, to make sure the user does not continue to have access to the Permit Element.
This logout method should be called as part of the logic of logging your user out with your authentication solution.
1
permit.elements.logout();Login Errors
There are a few possible errors you might find yourself come across while working with the embedding of Permit Elements.
| Error | Description |
|---|---|
USER_NOT_FOUND | This error can appear if you are trying to log in as a particular user, but that user does not exist within Permit. |
TENANT_NOT_FOUND | This error can appear when you are passing in a tenant, either in the frontend permit.elements.login function, or in your backend URL endpoint, where the tenant has not been created in Permit. |
INVALID_PERMISSION_LEVEL | This error will emerge when you are trying to access part of the Element which you have not been given access too. This usually means the role that the person obtained has remained in the Hidden Roles permission level. |
FORBIDDEN_ACCESS | This error will emerge when you are trying to login to an Element you have not been given permission to see. |
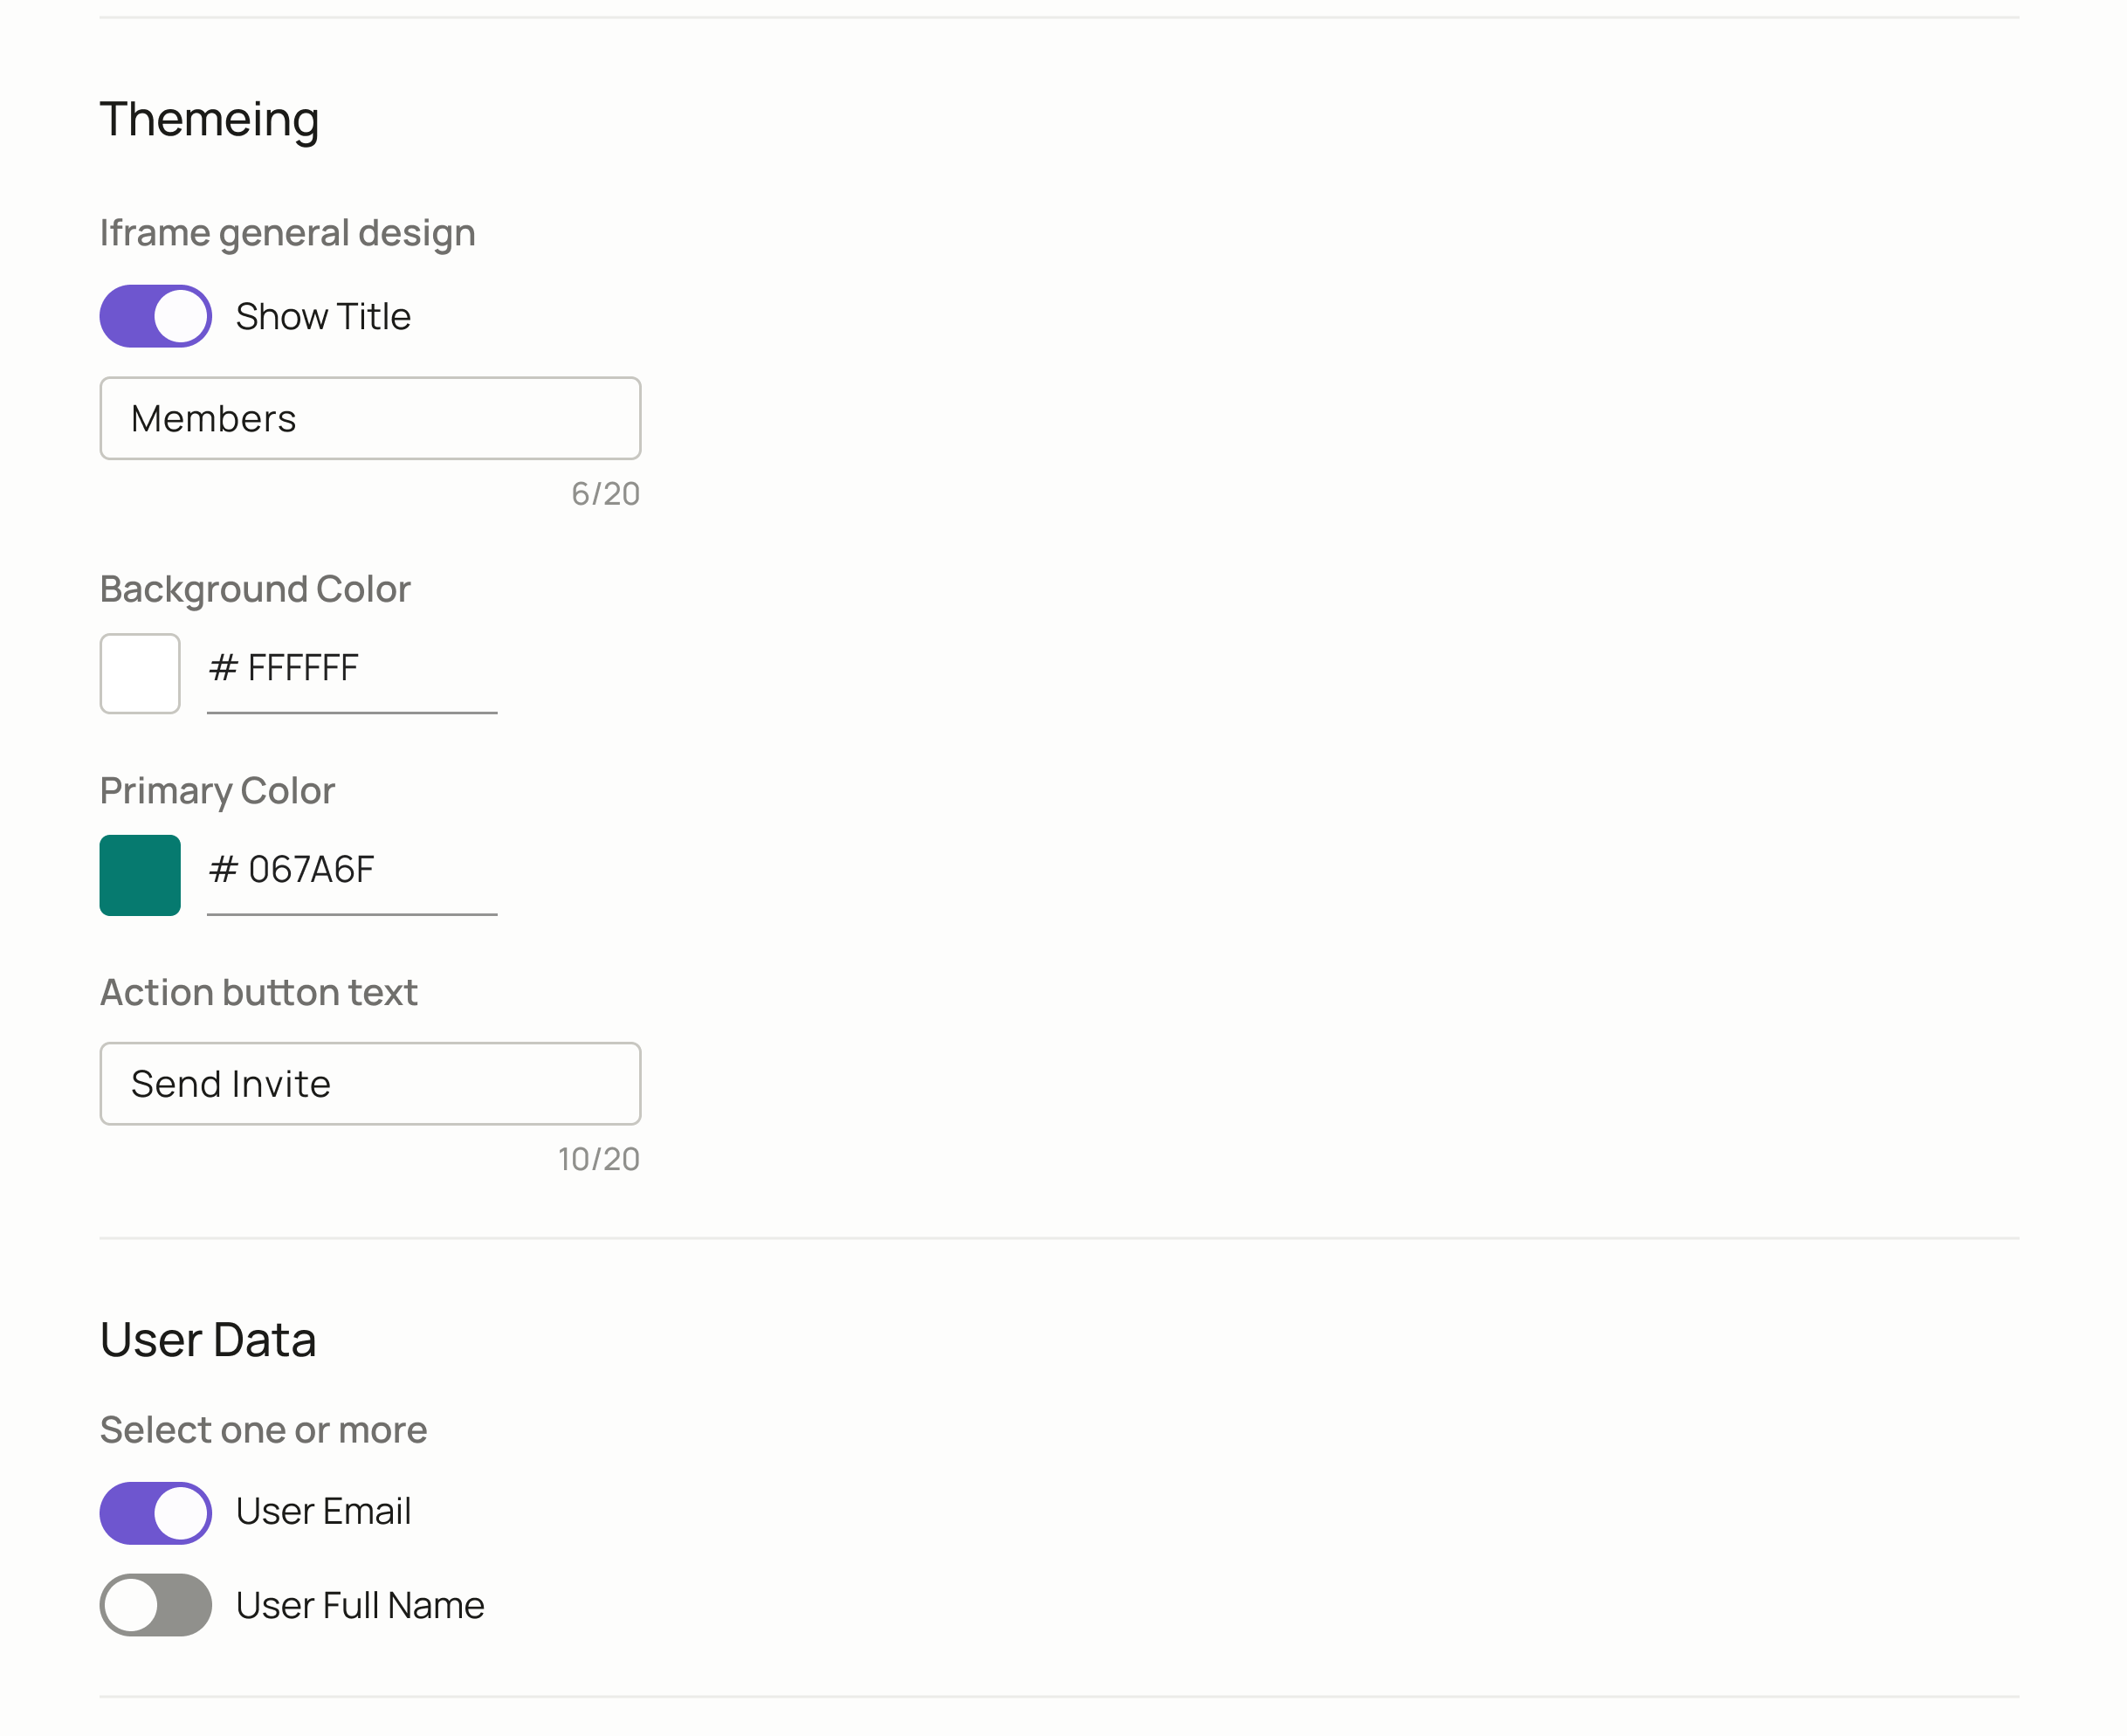
Customizing your Element
Each element offers customization and configuration.
Match your brand
With every new element, you will be able to adjust several setting to make the look and feel of the element really your own.
- Change the background and primary colour of any element to match your brand.
- Give the element a title that makes sense to your end user, or hide it fully.
- Decide if you want to display your users Email, Full Name or both on the element.
Configure your webhook
With some Permit Elements, you will get the option to configure a webhook to stay informed of the actions that are performed by the end users.

For the User Management Element, a webhook will allow you to recieve updates each time a new user is created in your system.
You will need to generate a new webhook URL that points to the running server-side application. As part of the configuration you are required to pass in a secret key and we will pass it as Bearer auth header with the user email role and level.
Embedding the iFrame
After you finish configuring and customising your element, you are ready to it into your App. A code snippet for the element
will be generated for you.
This will be an <iframe> that you can insert anywhere into your website. It will look like the code snippet below.
<iframe
    title="Permit Element Name"
    src="https://embed.permit.io/name?envId=<SOME_UNIQUE_ID>"
    width="100%"
    height="100%"
    style="border: none;"
/>